Wednesday 28 December 2016

Responsive - 11 Second Club - Continuation of Production


Rushing to meet the strict deadline, I continued making my animation and simplifying assets and details along the way. With the background being quintessential to both the premise and the color scheme, mid-way through animating the contours I stopped and started thinking about the medium of the background. Nevertheless, with time against me, I took pictures of my house to instill a realistic festive atmosphere that would coincide with the style of the animation. Furthermore, I figured that I can easily change the tint of the picture which would be compatible with a contour-trace stylization. The essential part of the animation is Karl Marx's presence, thus, I grabbed a picture of him and edited out the contours so that I may reuse him for every frame. Editing out his eyes so that I may animate them frame by frame gave the animation's cut-out nature a bigger vivacious and lifelike appeal which perfectly matched with the 15 fps deliberate lagginess of the movement. For his mouth I referenced my friend's mouth movements for every frame and tried to recreate it with simple black shapes. I thought about greenscreening my mouth saying the lines to put it on top of Marx's head, but given the limitations of time and the incompatibility of styles, I casted this aside although I'd love to use it in a future animation. One unplanned fit was Marx's shaking head since I duplicated and rearranged it for every frame with no precise guide, but only through reference - I found that this added to the glitchiness of the animation. Casting this aside, a problem arose while I was trying to import the Photoshop files into After Effects, thus, I had to export the animation without the background in transparent GIF sequences so that I may take them into After Effects. There, I compiled the final outcome where I merged the background with the animation. It seemed a bit flat as it stood dormant, so I added a Wiggler effect to it in order to eliminate that stillness. Moreover, since the original background of the reference video was slightly moving hence the camera was held in hand, this one had to as well for the sake of compatibility.


Friday 23 December 2016

Responsive - 11 Second Club - Late Beginnings

Inconveniences with Wacom Tablet
As this month has been gradually flowing, I have experienced a myriad of inconveniences that have jeopardized my stable and sturdy practice. I am set on creating an animation for the 11 Second Club brief, which ends when this month concludes. Following my planning on how to tackle this brief during the holidays (as I have many other obligations inbound, as well), I ran into one debilitating problem: my computer broke down due to hard drive problems. Immediately I took it to be repaired, and was amazed at the level of improfessionality at the hand of the computer repairers I sent it to as it took about 6 days for it to get repaired and for all of my files to get transferred. After it was fixed, my computer kept shutting down with a "blue screen of death" every time I attempted to install my Wacom tablet, and after a few days I resolved the issue - the driver for the USB 3.0 port (iusb3xhc.sys) was preventing the tablet from getting properly installed since I do not have a 3.0 port. At these times, my mind was clouded as I was getting frustrated and behind on the project. Luckily, I fixed it, and in doing so I instantly began the brief. I was not expecting such a drawback, and this has taught me to always have a plan B secure for anything (especially an external hard drive for not losing my files and animations). Nonetheless, I mapped out every day I had left for animating (I started on the 20th of December, expected to do so on the 10th), and figured I can tackle the brief, although it is going to be a close call. With not much time left, I settled for rotoscoping as it would be a straightforward technique. Revisiting my structure of ideas from before, I reviewed the parameters and rules of the challenge where it was specified that the content must not insinuate offence nor must it pertain sexual or explicit content. Furthermore, I had been thinking about the content and, reminiscning about COP and propaganda with the consideration that it is Christmas, the color red stuck in my mind. Thus, I formulated a story: Karl Marx is Santa Claus, proceeds talking to an elf where the end justifies the "one more thing" piece of dialogue where he looks at a list of Christmas toys that need to be manufactured as the only unchecked one is "seizing the means of production". Relevant to internet assembled pop-culture, I beleive that this is a harmless piece of semi-political comedy that will meet all of the requirements of the competition. I filmed myself and a friend lip syncing to the soundfile provided with several attempts, and then synchronized it with the soundfile in Premiere so that I may have a coherent piece to rotoscope without doing any unnecessary additional drawings. However, I exported the video in 15 fps in order to lessen my workload and to add an aesthetic that will consolidate the line boil. In other words, given the inconsistency of line smoothness in every frame, 24 or more fps would be too impetuous for this style of animation. Furthermore, I figured that the natural color of the characters would be best suited, thus, I am editing out the background manually with every frame where I will use different layers of the tinted footage so that the red color is dominant. As for Karl Marx, I will use several images of him to rotoscope so that there is a dichotomy between the characters so to instill a hint of peculiarity.

Thursday 8 December 2016

Animation 1: Character & Narrative Weekly Summary 10

Premiere Composition - Sound Keyframes and Editing
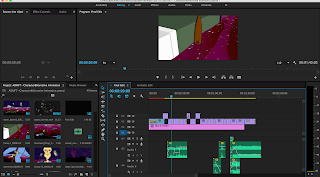
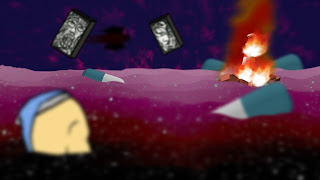
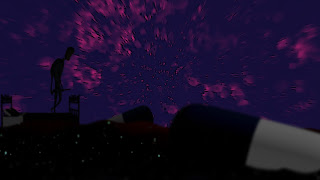
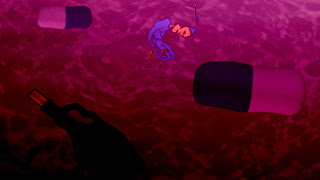
This week was arguably the most productive one in terms of work per day completed. It was a week jam-packed with composition, sound placement, greenscreening, alteration, planning, structuring, and last but not least, rendering. I must say, it was the most productive I've ever been, however, this hectic endeavor could have been avoided if me and Jay were to create a schedule in order to disseminate the workload effectively and equally, hence the previous week we stagnated for a bit. Nevertheless, this week has been a prolific success since we made the animation 2 days before the deadline, giving us time to check for any possible modifications and to articulate ourselves through this post and the evaluation. Upon dividing the scenes, this week consisted of rendering finished scenes and completing the compositing for the final ones. Because of inconsistent time planning, some modifications were made. For example, the scene where the lighthouse collapses features Jay's character flying through the air instead of ascending before his eyes. I composited this shot using the succubus and a pen-sketched path in After Effects, and in order to maintain consistency of the environment, referred to Jay's shots of the same space. Namely, the position of the pills needed to be identical to that of Jay's shots in order to avoid spatial confusion. Since we required to interchange assets, bobbing through flash drives, we used some alternatives that I shall consider beforehand in the future. One such endeavor would be the motion of my character in Jay's scenes which I composited with a red background in order to have it greenscreened through Keylight, since the other plausible way would be to transfer every single asset used in my After Effect projects, which is a really tedious task considering all my files were scattered all over my desktop (which is a lession in pedantry). I changed the export of the silhouette telescope scene due to Jay's output with him saying that it is too dark and vague in visuals, something I agreed with. Thus I changed that shot by adjusting the brightness in every consequent layer, making it fade from lightest in the foreground to the darkest in the background. Once all of the renders were done, me and Jay sat down to composite the animation, and in doing so made a few aesthetic additions to the finesse. We found that the way we had it composited differed from the animatic in some instances, thus we tried assembling the scenes to match the animatic but failed to do so since we have merged two scenes into one - noted. We added white visual noise to every shot in order to give it a subtle color adjustment, whereas we added my stop-motion ink animation (the one that's used as the background space) at the beginning with a fade to give off an early sense of eeriness in the audience. While Jay created the ending title with After Effects, I created most of the sounds for the animation since that's where one of my intermediate specialities reside. I recorded noises that my character makes, as well as the exhaling of Jay's succubus. Other than that, I generated and synthesized the rumbling of the lighthouse through adjusting the sound of me shaking a table with reverb, in order to flush and muffle it so that it seems that it is cast from a distance. Going back to the soundscape, I mildly altered the gains of every channel (every instrument) so that it does not pertain a discrepancy in loudness. The rest of the sounds I downloaded from a freesound.org, some of which I altered to fit the cues (such as reverberating the water splashes). I assembled all of the sound effects based on visual cues so that they tie in with the narrative, augmenting the flow of the scenes as well as their transition. I did this by keyframing gain drops and rises pinpointed to the exact frame where one scene ends and another begins, as well as fading in and out some sounds. However, despite all of this, I constantly asked for Jay's input and opinion on the soundscape, something that had proven to be both constructive and didactic. The final render was done on Jay's macbook since mine has insufficient RAM for Premiere composition and rendering, lest we desired to have it respond slowly every 5 minutes. Alas, the journey is over. We have persevered, learned, and purged into making an animation I am proud of. In comparison to my previous work, I can witness a drastic improvement in drawing, composition, and animation in general, whereas I can say the same for Jay. All in all, I believe that this was a thorough, if not meticulous division of workload as we compromised during the entire journey just to make sure that we get our even share of work - proving to eliminate possible obstacles and unwanted predicaments.

Adrift - https://vimeo.com/194840201

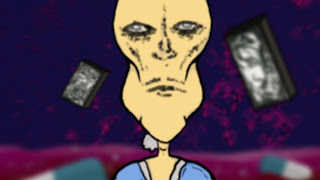
Succubus in the background

Wednesday 7 December 2016

Animation 1 Study Task - Strike a Pose

Relaying emotion is one of the most important techniques that an animator can have in order to drive the diegesis of the narrative. After all, animation is a method of storytelling just like film with all the same parameters only manifested through different techniques. I believe that with this study task I got to revise Maya since there was a possibility of forgetting everything I had learned about it last year, considering I do plan on doing at least one full animation in Maya in the future just so I can see the experience. Nevertheless, I consulted last year's notes on Maya and some of my peers into reminding me about Maya's tools, shortcuts, and workspace so that I could have full control of Moom and all of his controllers. Quite a structured task, I chose the emotions surprise, happiness, bravado, confusion, and envy since I thought that these 5 are the ones that can be most effectively portrayed by a character in a still image. For example, I find that anxiety and timidity can be thoroughly connoted only by an animated character, whereas it would be easy for those emotions to be misinterpreted in a still image. Anxiety manifests differently from person to person, whereas timidity is based on body language plus vocalization - based on what a man says, timidity can be inferred. Nevertheless, choosing these five emotions was not absolute, since I initially tried doing tiredness and exhaustion, but could not get them right in photographic reference, so I scrapped them. As I started posing Moom, it took me less and less time for every consequential pose while I got the hang of Maya yet again. I did not find the facial controllers difficult at all, and also realized that the position of one's eyelids do play a big role in emotion in relation to the position of the pupils. In 2D animation that is manifested through the shape of the drawn eyes, where with Moom it was about the eyelids. For example, for envy, it was extremely necessary to shape Moom's eyelids a bit closed, otherwise the emotion seemed dry and stiff. I followed every reference image to the bone except for surprise, where I thought that a sense of awe in the surprise gave off a more natural appeal to emotion. Nevertheless, I learned a lot from this study task although I was really tediously purging myself into doing it (which is why I did it now instead of the moment it was assigned to me just like the rest of the tasks).


Sunday 4 December 2016

Animation 1: Character & Narrative Weekly Summary 9

Effect values for background effects
As the deadlines are approaching, this week was the proper time to start rendering out the scenes. With the final touches of animation being done and some finesse in details being added, the final renders have begun. By carefully dividing the workload for composition, me and Jay created a schematic which outlined and numbered each scene (based on the storyboards), giving us insight on which scene am I to composite and which one he is to. We got together, worked on separate scenes together, and exchanged every necessary asset (I gave him the bottle and syringe, he gave me his pills, lighthouse, etc.). I believe this worked quite efficiently since it speeds up the process of rendering as well as indirectly halving my workload (me being used to compositing everything fully since I haven't collaborated before). Nonetheless, as we got to these final renders, we made some changes with small details of the animation. One such detail is discarding an unnecessary scene (scene 13, by chronology) due to the additional animation that had to be done and the minimal effect it has. Seeing as that scene is in profile, it would mean that Jay would have to draw a new upper rig, which is too much work for such an almost non-existent effect. Another example would be the compromise that me an Jay got into: completely discarding the red pill asset I made. The reason for this is the visual flaw in the mise-en-scene with its placement - the red pill does not blend with the backgroung due to its outlined style and color, however the blue one that Jay made does completely. Although I made that asset, for the sake of the animation I also decided to ditch it and replace it with the blue pill in every scene that I have composited priorhand. I recall there being a lecture where it was stated that collaborative animators must sometimes discard what they hold dear for the sake of the resolution of the animation, which is what I did here. Other than these significant changes on my end, I was just adding small details like wave warps, subtle blurs, and aesthetically-appeasing effects to elements such as the background, where at the beginning of this week I had given Jay all of the values and effects that I had used for every single element so that he may replicate the aesthetic for the sake of consistency when compositing his respective scenes. I had also found out that some of my scenes had an incorrect aspect ratio, something that I would have omitted in renders if Jay had not been assertive in checking all the settings beforehand, something I thanked him for dearly. Finally, with us choosing that we will render in TIFF format, both with the same quality and adjustment settings, I possess high quality pictures of some of the finished scenes which I can easily remove/modify when compositing the final animation in Adobe Premiere - I learned that it's always best to render in TIFF or PNG sequences.


FINAL CRIT SESSION:
I was quite invigorated by the insight I got from two of my peers, most of which reflected upon the intent of my character, background, and music coming across. Considering that I had two music tracks (which I personally made) to choose from, both of my peers agreed with me in choosing the more eerie one. I was also elated to hear that my character's personality could be inferred by his appearance. One thing I was told was to keep on animating since my peers weren't able to see much background motion from what I showed them (which is when I still did not animate the water or the assets). Perhaps this can be taken as criticism for speeding up things the next time I have a crit session in order to give the assessors more depth for the sake of consistent criticism.

Responsive - Considerations - 11 Second Club

As I ruminated before - the desire remains: I am going to enter this month's 11 Second Club. Based on the soundfile that I heard posted on their website, and given that I do not know which film it is from, I thought of several sketches with my own made context for the animation. However, the most important part I believe is the medium of choice, henceforth I am still in the experimental mentality of trying out new techniques I have never done before. Nevertheless, I must consider the limitations before me, both technical and situational, for the technique I had a fix idea on was traditional animation with watercolor. Because I am heading back to Macedonia with a limited array of luggage items, I have decided that I am not going to do watercolor for I do not have a lightbox home and am fearful of breaking one if I buy and choose to put it through travel. Thus, with stop-motion being a ubiquitous olden choice of mine, I was swept by inspiration as I was looking at one of my peers' animation - rotoscoping. I've never done full body rotoscoping which is why I wanna try it out with an awareness of possible mistakes - from which I will learn. Heading back to the dialogue, with it ending on a loose end ("there is one more thing...") I will be able to end my animation with an allusion or insinuation that is to foretell the following action through anticipation within the audience's mind, which would break the insipidity of most of the animations' visual context I've seen during the previous months of the challenge. Not discarding my desire for watercolor traditional animation, I believe that I will tackle the next animation brief through this technique, or perhaps will do so with one of the major collaborative briefs following the holidays.

Friday 2 December 2016

Potential & Limitations 5 - Blurs in Motion and Depth of Field

Motion blur in movement - insinuating fast movement
I have time and time again witnessed the amplification of smooth movement motion blurs evoke, and how they interact with different keyframe interpolation effects to create a satisfactory flow. Due to this, the moment my collaborative partner Jay pointed out the motion blur layers in After Effects, I was dazzled by the immediate embellishing resemblance to Kiszkiloszki's work. I started researching effective methods of using motion blurs accordingly, as well as looking and critically analyzing Kiszkiloszki's animation. Then, I reverted back to the Animation Survival Kit and the online derivatives of that knowledge, finding some relevant online sources and one extremely plausible GIF image that reminded me of one crucial benefactor - motion blur is to be prominent with fast motion. Considering all of this research, I applied motion blurs to Seth's fast motion, such as him flying through the air or arising submerged from water after being thrown. Seeing as those two scenes are in sequence, the motion blur would be more noticable and promiment, giving off the sence of rapid motion in the eyes of the audience. Diverging from this, I continued scouting the internet about blurs and started experimenting with gaussian blurs of the assets in every scene, only to find out that it gives off the depth of field illusion of distance, as well as the shifting focal point of the scene. So, having this in mind, I utilized the potential of blurs and added it to almost every scene. However, because it is a manual blur, the limitation is in being careful not to have inconsistent values between assets, for some are scaled from bigger images that would need more gaussian blurs for the same distance in effect - something I realized after several detailed looks at unsatisfactory renders.


Principles of Animation GIF - https://media.giphy.com/media/3oriOiLUqWXA9Rc7eM/source.gif

Subtle blurs for depth of field

Tuesday 29 November 2016

Potential & Limitations 4 - Greenscreening

Left - With Mask, Right - Without Mask
With the intermediate blending of all different assets together being underway, two techniques in particular became the limitations, but also with potential enclosed in them, of this didactic journey of animation. Greenscreening holds in itself many potentials which I wish to fully harness for this animation and every future one to be made. With Jay doing the 3D, I was to composite the video he gave me of the lighthouse collapsing, and with that got into research for how to do it. Considering that I am a very visual learner, I quickly searched online tutorials and found that Keylight 2.1 is the way to go - reminiscent of last year's After Effects induction. As I filtered out the green from the footage, I realized that due to the gradient fade of the smoke's opacity the green behind the inconsistent smoke only changed color and did not preserve a transparent opacity. In other words, there was no fading aspect to the smoke, making it a bit flat since it did not have translucency to reveal the background. Having said this, I researched different methods of executing this technique. The animation of the smoke can be exported in transparent PNG sequences to eliminate this problem, however, would take much longer to render out. Another thing I learned is that greenscreening is only to be used for shots that have a full opacity since the color pallette does not allow for preservation of transparency. Thus, for smoke effects (or anything that has an inconsistent opacity) one is to use the particle effects prepackaged with After Effects, which calls for a new destination of research as using them is not quite easy and straightforward. Nevertheless, I wanted to work with what I had, which is why I used a mask around the smoke contour in order to simulate that translucency that I am looking for, which also revealed to me the potentials and limitations of masks. Aware of their functionality, I experimented with the mask's "feather" level (as named in AE) around the lighthouse to find out the parameters of convergence - the mask going within the composition it is wrapped around. To my surprise, the fading worked wonders in fixing the problem, and in doing so teaching me a lesson about future endeavors where I would need to use a different technique in order to avoid the same problem.

Monday 28 November 2016

Animation 1: Character & Narrative Weekly Summary 8

Second verse, same as the first. This week also consisted of the continuation of the composition of the scenes, along with some additional animation for my character's face and movements. Revisiting some of the old scenes that I was making last week, I added a few changes that beautified the scenes, and with Jay slowly getting to create some of the assets (like the pills, bottles, and syringe) in 3D instead of 2D like me, the mise-en-scene of the animation is getting more full and complete. Nevertheless, I can pinpoint the scenes I've been working on this week easily as I have a separate After Effects file for every scene for the sake of organization and simplicity. With Jay having the lighthouse collapsing done, I greenscreened the original video using Keylight 2.1 in After Effects (something I picked up from last year's inductions) and placed it in the scene while giving 2/3 of perspective with the Duik animation of my character emerging from the water. With this scene, I believe that the motion blur of Seth adds to the illusion of speed, whereas the Ease-In keyframes allow for a smooth sinking movement. Also, with Jay's character animation being underway and nearly completed, I focused on the scenes where our characters interact, such as when Seth coughs from the Succubus' smoke. Because the face animation of this scene is created separately, I used Time Remapping to match the and sync the movement of the chest with the face so that it may connote a cough. I'm actually quite amazed at how every problem so far I've been solving through trial-and-error and quick online tutorials, which is where I learned Time Remapping, 3D Layers, etc. However, I believe that there is a better way to craft scenes and although I've managed to pull off the illusion of perspective, I can research more into every effect within After Effects to further the elaboration of scene. For example, the technique I am using for making the water can only function horizontally, and wherever there is a scene that requires the torrent of the water to be of a different angle, I must use a 3D Layer to tilt it, which inadvertently exposes the flatness of the image a bit. Nevertheless, the final scene I made was the actual first scene so that I may see whether the plentifulness of the items and assets in the sea would give off that cramped sense that the space is desolate yet difficult to maneuver through.


Saturday 26 November 2016

Responsive - Finishing Animation - Loop de Loop

I have finished my first Responsive task, and inadvertently my first online animation submission. It is the first time I have entered an animation competition and I believe that with this I have successfully broken the ice in terms of confidence - more challenges and contests soon to be entered. Furthermore, I am quite elated that I was able to accordingly factor in this project alongside other college briefs without being overwhelmed or stressed, which calls for effective time management - something I truly value (submission date was 27th of November). Although this was the case, I do believe that I would need to plan out which days in advance I will solely focus on one project, and which days on another, just so that I don't procrastinate by giving myself invalid reasons and excuses. Although I have uploaded my loop onto Vimeo and have sent it to loopdeloop.org, it still hasn't popped up on their website. Even if it does not qualify, I am hoping to receive feedback from Loop de Loop about my animation - why did/didn't it qualify, have I met all the requirements gracefully, does it pertain quality? I have found that critical feedback of my work does infuse me with motivation as much as challenges do (along with strict deadlines). Setting this aside now as being completed, I will most probably tackle Do It In 10 or 11 Second Club as one of the more major individual responsive briefs seeing as I will have much time this winter with our Animation 1 module ending on December 9th, unlike last year where I had to work on the same module during the winter with the submission being after the holidays. Even though I am quite satisfied with the outcome, I've learned a valuable lesson with this animation: ALWAYS WATCH OUT FOR CONSISTENT FRAME RATES. In other words, with me animating this in Photoshop (in 29,97 fps) but editing it in After Effects (in 24 fps), some of the frames of the animation did not render out and became missing, being drastically detrimental to the smoothness of the animation. I could have avoided such a confounding mistake, however, a clever animator learns from his mistakes and NEVER repeats them.

Loop de Loop - Breakfast - https://vimeo.com/192971257

UPDATE - 29.11.2016:
I have received feedback from contacting Loop De Loop due to my skeptical demeanor of my animation not getting qualified. Personally, I believe that me contacting them was the right move hence it helped me diminish paranoia.


Monday 21 November 2016

Potential & Limitations 3 - 2D in 3D Space

Although I already considered the interaction of 2D and 3D assets in my previous posts, I ran into certain limitations and conundrums during the assemblage of the scenes. In detail, the perspective grid of the shots that DO NOT rely on the one-point perspective view of the shot will possess a problem with the water and how it flows around the assets. Particularly, the test animation that I made to elaborate on the interaction of the water did not encompass shifting perspectives, which would reveal the flatness of the images and ruin the 3D space that I am constructing. For example, the scene where Seth's rowing is revealed as the ore passes through the water is not fit for this manner of animation, and instead, must have an alternative. In order to resolve this problem, I began researching online the 3D potential of After Effects since I was informed by one of my tutors that it possesses a workable 3D space (similar to Maya). After looking through tutorials, I discovered the 3D Layer (something I surprisingly did not know before) and how it will provide a feasible answer to my dilemma. However, it took me a while to fully grasp and understand the parameters of this tool hence the image (or layer) that one models around the 3D space is NOT like the bicubic interpolation in Photoshop, but instead revolves around the anchor point of the image where the X,Y, and Z axis are placed. Thus, once I understood this, I comprehended that in order to make the water flow logically I had to assign all layers of water on the same anchor point so that they may envelop the scene in compliance to perspective. Once I had a 3 hour take on this with trial-and-error, I finally managed to composite a solid, 3D imitating scene by using keyframes to animate and move the anchor point, as well as the Wave Warp tool to give the layers a flow that imitates water. Given that the bed is a 2D image, I had it behind one of the water layers, since if I transformed that layer into 3D as well the mesh would have been broken in-between the water frames, inadvertently ruining the illusion. However, I believe that in order to finish the scene I will need to animate the contours of the water around the ore - it appears as it is passing through a horizontal flat image as the ore moves through it.


Animation 1: Character & Narrative Weekly Summary 7

This week consisted of compositing scenes for the final animation. With both me and Jay working on each asset separately, 50-50%, be it individual character animation or design of backgrounds, I believe that this week was also quite productive, despite the 3 days of no production during Manchester Animation Festival. Other than composition of pre-animated assets (like Seth's face or his rowing movement), I also did additional animation for the movement within the scenes. For example, I started animating the telescope scene where Seth looks through the telescope to find the lighthouse from afar - by using easing in and out between keyframes, I was able to mimic a lifelike POV and reduce the "mechanical" appearance of it to a bare minimum. With me receiving the individual shots of the lighthouse, as well as the animation for the lighthouse collapsing (which Jay did), to put it bluntly: pure production this week. Initially, first I am doing the animation for every scene, then placing the background assets (like the bottle, faces, and injection) in layout, because I believe that I should prioritize the animation hence I can speculate that there are going to be no problems or limitations with the background items. I also composited the scene that I thought would be amongst the most difficult and tricky to do - the lower angle rowing shot. Because it is a 2D animation, I used the 3D layer tool in After Effects, and to my surprise, it actually turned out to be a valid resolution. As I take some time to reflect on my previous animation preferences and "beliefs", so to say, I have found that I have gained a much more profuse utilization of keyframes and tweens for animation, making my animations much more smooth and robust in flow than ever before... every single animation I have worked on has had different techniques and new experiences for me.


Monday 14 November 2016

Animation 1: Character & Narrative Weekly Summary 6


This week was amongst the most productive once hence I primarily focused on Character & Narrative considering I became a bit paranoid at the passage of time (although I am on top of my work). Nevertheless, this week had been flexible in that I worked on details and animations for my animation from A to Z and made quite prolific progress. In terms of animation, I rigged Seth while rowing and animated his movement. I ran into some problems in terms of how to layer him holding the paddle, but got round that naturally through trial-and-error. Furthermore, I animated his silhouette during when he is pulling out the telescope, as well as creating and animating the telescope POV vignette for when he is to look through the glass. By using the eclectic tools in After Effects, I made the telescope mildly shaky to contemplate the waves that surround Seth, effectively improving the synthesis of the environment and the character and by doing so improving the narrative, as well. Just to add a bit of detail to the environment, I created a wine bottle and injection that facilitate the symbolism of addiction even further, all assets that are going to be used once I start properly laying out the scene (next week). Other than that, I began creating Seth's face for other poses, such as when he is rowing and when he encounters the succubus. I tried to grasp his emotion by exaggerating his facial features with thick/thin plentiful lines, as well as converging his pupils. All in all, I believe that I got the gist of the emotional translation and his face would perfectly depict his feelings about the situation once the animation gets lined together. Finally, I created the layering for the water which I will mold and shape based on the bed-boat on which Seth will venture once we render it out. Unfortunately, the UV Maps that I textured did not imprint on the lighthouse as visualized. Nevertheless, it was still good practice and a mistake that we can learn from - considering that they were too detailed as well and might have not blended well with the whole aesthetic of the environment.


Sunday 6 November 2016

Animation 1: Character & Narrative Weekly Summary 5

Seth's face stills from the animation.
Through this week the digital and technical progress has began its full swing as I've made progress in all areas of my animation. Given that our animation's interface revolves around transparent video layers that are to be superimposed in After Effects, I have the freedom to animate every asset independently and separately without relying on external factors. Analytically speaking, this was quite a good tactic me and Jay appropriated since it did not bind our dependency but still enabled a plethora of opportunities where we would work together to attain the product, open to suggestion and flexibility. Nevertheless, I began mantling some of the scenes, particularly the last one to see how the assets would interact with each other. I got even more elated when I reaped the fruits of this flexible multi-video layer technique as it gave me an opportunity to fully utilize the effects prepacked within After Effects, such as the wave effects which simulate water - perfect for the concluding scene. Furthermore, I rigged Seth for this scene and made him assume a fetal position while sinking, proving that DUIK is an immensely helpful rigging tool. Casting that aside, I started animating the face of Seth, in particular his face during the string of establishing shots at the beginning (him yawning), using the drawn finished version of him facing front as reference where I will attach the face when we composite the scene within AE. With the range of textured brushes Photoshop has, I was able to digitally recreate my initial desire to do his face traditionally in charcoal, with a little taste of German expressionism by using murky and smudgy lines. Finally, as Jay was modelling the lighthouse, I created the UV maps that are to be attached to the structure to make it assume a realistic form, yet maintaining that low-poly aesthetic. I created them by using the outlines (which are Maya edges) as reference for transitions between geographical shapes, all of which are filled with the texture but with a different color and/or layer blend.

The sinking scene and assets.


DUIK rigged Seth for the sinking scene pose.


Finished UV Maps


UV Map contours for reference

Responsive - Animation Production - Loop de Loop

With the background created, I plunged full-heartedly into production. I figured that Photoshop CC would be the best for this task hence I can use video layers to animate and then have them exported onto After Effects for layouts. This is a new technique that I've been using recently where I do every instance of an animation separately, cross-referencing them, and then piling them together where I am freely able to add motion effects and adjust the scale of said elements. Luckily, this came quite in handy given that both the bacon and the egg in my animation (which is what I've done so far, the tomato is missing) are too small within the window of the aspect ration, thus I'll adjust them once I'm done with them. Getting support from one of my proctors on the technicality of my animation, I was told that the background lines that follow the contours of the tiles seemed too inconsistent, which once I looked into that further found it to be true. Since then, I've adjusted the background frames so the lines maintain consistency without fragmenting the animation and carrying the focal point of the viewer away. Getting back to production, for the bacon I used one layer for the outline and the same one for coloring (with the magic brush) since every frame had been drawn/colored separately. However, with the egg I figured that a single drawing can be animated only in motion and scale so that I may retain the shape of the egg (given that it is radial, I would not be able to draw a perfect oval every single time with a drawing tablet). Thus, in order to solve this, for the egg I used several layers (about 40), all of which were bound together in one video group - it is not a video layer, but several frames merged into a group. Moreover, for the yolk and white I went on with the classic traditional technique where every frame has to be drawn separately in order to maintain the boil of the figure. So far, everything has been great with this responsive task and at this rate I am hoping to finish this in a week and move on to two more briefs of my choosing.

Stills of my animation with the path